
If you use CKEditor as your WYSIWYG editor, you've probably, at some point, had to figure out which module to use to integrate it into your Drupal site. CKEditor or WYSIWYG?
Without going into too much detail, there are arguments for (and against) both modules. CKEditor offers more granular control over some of the editor configuration settings on the module settings page, while WYSIWYG offers integration of multiple different client-side editors and the ability to assign different ones to different input formats. Ultimately it comes down to what you need, and personal preference. I used to favor the CKEditor module because it was easier to configure, but on a recent project I decided to give WYSIWYG another try. It was a little challenging to get it set up the same way as I usually do with CKEditor, but I was able to get it to do what I wanted.
Here's what I wanted to do:
- Make sure my editor uses the same css that my site uses so that what I see is actually what I get
- Define my own "styles" for the "Font Styles" drop down in the editor toolbar
- Override the default grouping of buttons in the toolbar
This tutorial is for Drupal 7 or 6. You'll need to know a bit about javascript and php to follow along. There is also a bit of custom module code involved. I've attached the custom module we'll be using at the end of the post.
NOTE: The version of CKEditor I was using for the example was 3.6.2.7275. Sometimes CKEditor changes things in it's api. For example, I tried using the D6 module on a site that was running an older version of CKEditor (3.2.x.xxxx) and it didn't work. Just keep that in mind if you did everything correctly and it's still not working.
Getting started
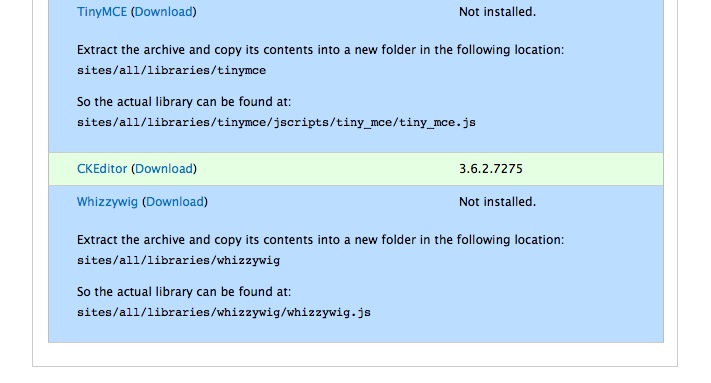
So firstly, you'll need to download the WYSIWYG module and install it. After successfully installing the module, go to the configuration page at admin/config/content/wysiwyg. There is a list of supported editors along with some basic instructions of where to put the editor's code once you've downloaded it. If you un-collapse the "Installation Instructions" fieldset and scroll to the CKEditor entry, there's a nifty link that will take you to the CKEditor download page. Download the most recent version of CKEditor and unpack it to sites/all/libraries. If you did everything right, the CKEditor installation instruction should look like this:
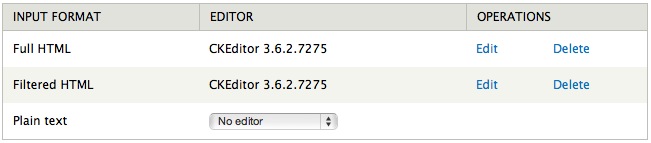
At the top of the wysiwyg configuration page, you can now assign CKEditor to your input formats. Don't forget that any html produced by the editor is still subject to any input filter rules you have set up. So, even if you have all the buttons enabled on the editor toolbar, but you're limiting the allowed HTML tags in your input filter settings, your text may not look like what you expect when it's rendered onto the page. To make things easy, I'm going to do this tutorial using the Full HTML input filter.
CSS Setup
All we're trying to do here is make sure the editor text area is using the same css as my content area that the text is going to be rendered into. If you're not using an administration theme, then you probably don't need to do anything because the default is to use the theme css in the editor. If you are using an administration theme, then you need to change this setting. From the WYSIWYG configuration page, click on the "edit" link on the "Full HTML" input format.
Expand the CSS fieldset and change the Editor CSS to "Define CSS".
Now, in the CSS Path textfield we just need to provide a comma separated list of css files for the editor to use. Don't be fooled by the "%t" token! The theme that it's referring to is the current theme, which is the administration theme. In my example, I'm using Bartik so I'm going to supply the following css files:
Save the settings and check out your editor. The easiest way to check if it worked is to just type some text and see if it looks like it's supposed to, but to be double-sure, use firebug or Chrome's built-in inspector to inspect the editor text area. Find the editor iframe element and expand the <head> tag. You should see your css listed there.

Now depending on how you've css'd the text on your site, you may need to consider that everything in the editor's text area is wrapped only in a <body> tag. So if you have any special text formatting that's more specific than that (e.g. #content-area ul li {font-weight:bold;}), you'll need to add some css for the formatting to be reflected in the editor. The tricky part is targeting just the <body> tag in the editor and not on the whole site. CKEditor outputs the <body> tag with certain classes depending on how it's configured (ex: cke_show_borders), but you might not always be able to rely on that. One way around this is to have a special css file that gets added only to CKEditor through the settings page (like we did above). Another way would be to add a custom class to the <body> tag itself. This is possible with the WYSIWYG module API, but is a little more complicated. More on that later.
Define Styles
I quite like the "Font Styles" tool for formatting text. It's a good way to define specific formatting sets so that my content looks consistent with other text on the site. More importantly, though, it's a good way to limit the amount of formatting a client has access to so that they don't end up making a beautiful site look awful by changing the font to Times New Roman, 16pt, bold, and bright red with a yellow background (you know what I'm talking about). The problem is that the default styles that come with CKEditor are just... hideous. Seriously? Blue Title and Red Title are the top options? That needs to change.
Now, you're supposed to be able use the "CSS classes" text field on the settings page to specify your own styles, but it doesn't really work right now. It's being dealt with in the issue queue, though, and likely will be fixed very soon. The current workaround is still good to know, however, as it teaches us how to override any CKEditor config setting (even the ones not available through the WYSIWYG configuration page, of which there are many), through the use of hook_wysiwyg_editor_settings_alter().
If you haven't done any module development before, don't be afraid, this is really easy. If you are a module dev first timer, a quick note about hooks: The hook system in Drupal gives module developers a way for other developers to interact/intervene with something their module is doing. (The hook system roughly mimics an Aspect Oriented Programming Paradigm, if you're into that kind of stuff). In this case, we will be using the hook called "hook_wysiwyg_editor_settings_alter" to alter the CKEditor settings before they're actually output. You can read more about hooks here.
I'm going to create a new module called "ckeditor_custom" (if you are working on a site that you already have a custom module on for hooks, by all means use that instead). I'll start by creating a folder of the same name in sites/all/modules/custom, and adding two files: ckeditor_custom.info and ckeditor_custom.module.
The info file will just have the minimum info to get started:
name = CKEditor Custom
description = Custom configuration for CKEditor
core = 7.x
;core = 6.x if you're on drupal 6
And then, in the module file, we'll add our hook -- I've added some comments to explain what's going on (don't forget to put "<?php" at the top of the file):
/**
 * @file hillside_custom.module
 *
 * Includes minor tweaks to hillside that can't be performed through config.
 * This should mostly be just drupal hooks etc.
 */

/**
 * Implements hook_wysiwyg_editor_settings_alter()
 */
function ckeditor_custom_wysiwyg_editor_settings_alter(&$settings, $context) {

  // The $context variable contains information about the wysiwyg profile we're using
  // In this case we just need to check that the editor being used is ckeditor

  if ($context['profile']->editor == 'ckeditor') {

    // The $settings variable contains all the config options ckeditor uses.
    // The array keys correspond directly with any setting that can be applied
    // to CKEditor - as outlined in the CKEditor docs:
    // http://docs.cksource.com/ckeditor_api/symbols/CKEDITOR.config.html
    // Another way to override configuration is to use your own configuration javascript
    // file. In this case, we're going to add our own configuration file that will
    // Hold our stylesSet customizations...
    $settings['customConfig'] = base_path() . drupal_get_path('module', 'ckeditor_custom') .
                                '/ckeditor_custom_config.js';

    // We are also going to specify a custom body id and class
    $settings['bodyId'] = 'ckeditor_custom_id';
    $settings['bodyClass'] = 'ckeditor_custom_class';

    // To see what's in $settings and $context, install the devel module
    // And run the variables through the dpm() function.
  }
}
NOTE: I just want to point out that (in addition to changing config options in the customConfig file) the $settings array can have any setting that ckeditor describes in http://docs.cksource.com/ckeditor_api/symbols/CKEDITOR.config.html. This includes "bodyClass" and "bodyId". By adding those settings to the array, you can set custom body classes or an id. I know I commented on this fact in the code, but it's a useful and important feature of this hook.
Now, we need to add the ckeditor_custom_config.js file that we just referred to. Create the file at the root level of your module folder and add this:
/*
  Custom configuration for ckeditor.

  Configuration options can be set here. Any settings described here will be
  overridden by settings defined in the $settings variable of the hook. To
  override those settings, do it directly in the hook itself to $settings.
*/
CKEDITOR.editorConfig = function( config )
{
  // config.styleSet is an array of objects that define each style available
  // in the font styles tool in the ckeditor toolbar
  config.stylesSet =
  [
        /* Block Styles */

        // Each style is an object whose properties define how it is displayed
        // in the dropdown, as well as what it outputs as html into the editor
        // text area.
        { name : 'Paragraph'   , element : 'p' },
        { name : 'Heading 2'   , element : 'h2' },
        { name : 'Heading 3'   , element : 'h3' },
        { name : 'Heading 4'   , element : 'h4' },
        { name : 'Float Right', element : 'div', attributes : { 'style' : 'float:right;' } },
        { name : 'Float Left', element : 'div', attributes : { 'style' : 'float:left;' } },
        { name : 'Preformatted Text', element : 'pre' },
  ];

}
Now enable the module, make sure the "Font Style" button is enabled on the ckeditor WYSIWYG profile settings page, clear your browser cache if necessary, and go check out your new styles.
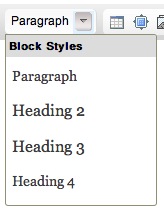
<< Nice! Done.
It's worth noting that you can actually skip this whole module entirely by just adding the javascript directly into the config.js file included in the ckeditor library at sites/all/libraries/ckeditor/config.js. I wouldn't recommend this though because you'll likely lose the customization when you upgrade ckeditor at some point. Also it's bad practice to edit files in third party libraries/contrib modules etc.
Overriding the Button Groupings
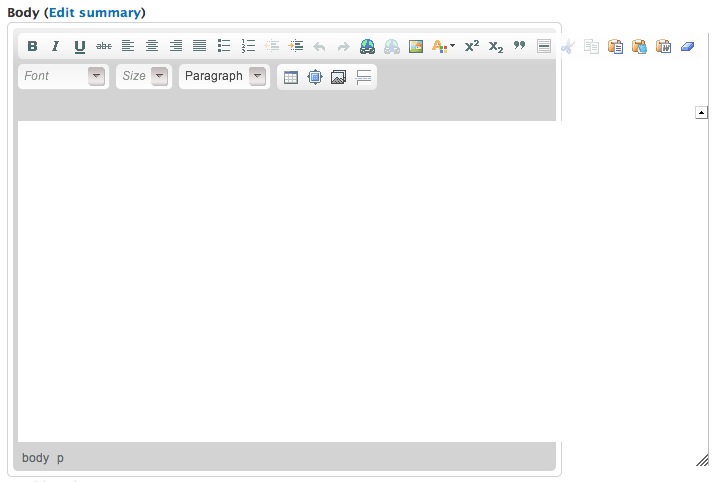
This last thing I want to do is a little tricky and requires a bit of a hack. What I want to do is make the button groupings different so that my editor toolbar doesn't look like this:
There isn't a way to do this through the ckeditor_custom_config.js file so we have to modify the $settings variable in our hook. The $settings array contains an array keyed as "toolbar". By default all the buttons are lumped in an array under $settings['toolbar'][0]. When the butons are rendered into the toolbar, the default ckeditor grouping is used. We can modify the grouping by regrouping the buttons into multiple arrays in $settings['toolbar'].
/**
 * Implements hook_wysiwyg_editor_settings_alter()
 */
function ckeditor_custom_wysiwyg_editor_settings_alter(&$settings, $context) {

  // The $context variable contains information about the wysiwyg profile we're using
  // In this case we just need to check that the editor being used is ckeditor
  if ($context['profile']->editor == 'ckeditor') {

    // Specify the custom config file that defines our font styles
    $settings['customConfig'] = base_path() . drupal_get_path('module', 'ckeditor_custom') .
                                '/ckeditor_custom_config.js';

    // We are also going to specify a custom body id and class
      $settings['bodyId'] = 'ckeditor_custom_id';
      $settings['bodyClass'] = 'ckeditor_custom_class';

    // Make sure the toolbar is there
    if (!empty($settings['toolbar'])) {

      // These are our desired groupings. Buttons that aren't listed here will be
      // Grouped in one big group at the end
      $preferred_groupings[] = array('Source');
      $preferred_groupings[] = array('Bold', 'Italic', 'Underline', 'Strike');
      $preferred_groupings[] = array('JustifyLeft', 'JustifyCenter',
                                     'JustifyRight', 'JustifyBlock');
      $preferred_groupings[] = array('BulletedList', 'NumberedList', 'Outdent', 'Indent');
      $preferred_groupings[] = array('Undo', 'Redo');
      $preferred_groupings[] = array('Image', 'Link', 'Unlink', 'Anchor', '-');
      $preferred_groupings[] = array('TextColor', 'BGColor');
      $preferred_groupings[] = array('Superscript', 'Subscript', 'Blockquote');
      $preferred_groupings[] = array('HorizontalRule', 'break');
      $preferred_groupings[] = array('Cut', 'Copy', 'Paste', 'PasteText', 'PasteFromWord');
      $preferred_groupings[] = array('ShowBlocks', 'RemoveFormat', 'SpecialChar', '/');
      $preferred_groupings[] = array('Format', 'Font', 'FontSize', 'Styles', 'Table');
      $preferred_groupings[] = array('SelectAll', 'Find', 'Replace');
      $preferred_groupings[] = array('Flash', 'Smiley');
      $preferred_groupings[] = array('CreateDiv', 'Maximize', 'SpellChecker', 'Scayt');

      // An array to hold our newly grouped buttons
      $new_grouped_toolbar = array();

      // Compare each desired groupings to the configured buttons in the toolbar
      // and add them if they are there
      foreach($preferred_groupings as $button_group){

        // array_intersect() compares two arrays and returns an array of values
        // That are present in both arrays.
        $matching_buttons = array_intersect($button_group, $settings['toolbar'][0]);

        if (!empty($matching_buttons)) {
          // If there are matching buttons, we add it as an array to our
          // $new_grouped_toolbar. We run $matching_buttons through array_values()
          // to reset the array keys back to starting from 0.
          $new_grouped_toolbar[] = array_values($matching_buttons);
        }

      }

      // For extra safety, we're going to find any remaining buttons that we
      // missed. To do this we need to flatten our grouped buttons and compare
      // that against the original toolbar to see if we missed anything
      $new_flattened_toolbar = array();

      // Flatten our grouped buttons
      foreach ($new_grouped_toolbar as $key => $group) {
        $new_flattened_toolbar = array_merge($new_flattened_toolbar, $group);
      }

      // Array diff returns the keys that are present in the first argument, but
      // not not present in the second
      $remaining_buttons = array_diff($settings['toolbar'][0], $new_flattened_toolbar);

      if (!empty($remaining_buttons)) {
        // reset the array keys and add it to the $new_grouped_toolbar
        $new_grouped_toolbar[] = array_values($remaining_buttons);
      }

      // Replace the toolbar with our new, grouped toolbar.
      $settings['toolbar'] = $new_grouped_toolbar;

    }
  }
}
And that's it. Reload the editor and it should look something like this (depending on which buttons you have enabled):

It seems like a lot of code just to group your buttons, but it works. Eventually, I'm sure the WYSIWYG module will have some sort of GUI to order and group the buttons, but until then, this will have to do.
Conclusion
So that's it. We've managed to get our CKEditor to look the way we want, using the WYSIWYG module, without having to hack any module code or libraries. Great. Of course all this stuff is easier using the CKEditor module and doesn't require a custom module, but you never know when you're going to be stuck with the WYSIWYG module on a project and need this.
In case you just wanna quickly get going with this, I've attached the ckeditor_custom modules (D7 and D6) here: