

We recently had the opportunity to dive into developing a site using the layout builder as the primary method of layout and block placement. Although we were apprehensive to rely on a currently experimental module to handle all the layout and content organization once we dug in, we were pleasantly surprised with how it handled what we threw at it. That being said there was a fair amount of setup needed to really get it working how we wanted it to. In this post I’m going to go over the basic setup we used and in a future post I will examine some of the more advanced tools we developed to get the most out of it.
In addition to Layout Builder and Layout Discovery, we used two other modules Layout Builder Restrictions and Block Blacklist. These enabled us to have a little more control over what the client has access to placing and helped make the list of items available to place feel a little less daunting.
Setting up your defaults with Block Blacklist
Once you’ve enabled all the modules the first thing I’d recommend doing is a little bit of housekeeping with your blocks. We can go over to /admin/config/block_blacklist/settings and start globally removing all of the blocks that come in core that are rarely used. This is done by entering the corresponding block id’s into the global blacklist.
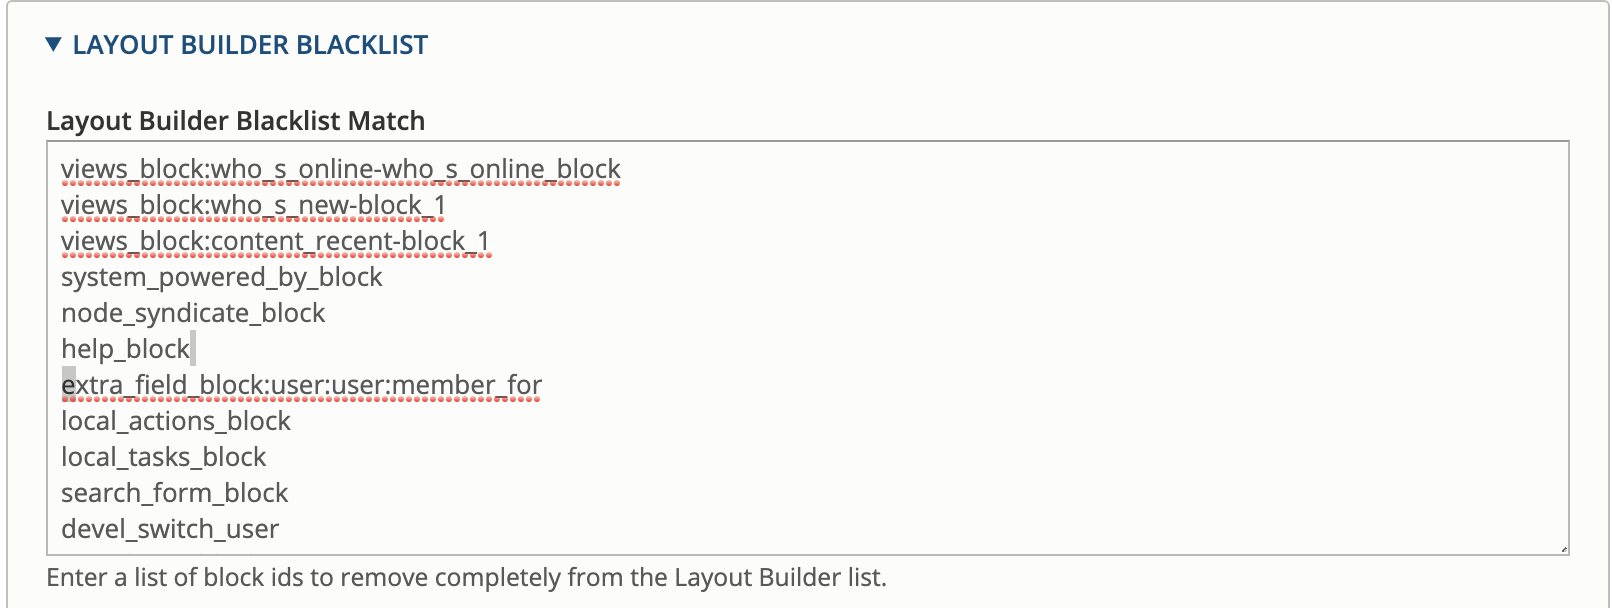
You can also choose to disable them for the layout builder only if it’s something you might be placing elsewhere and just want to restrict the client from accessing.
Customizing your content types with Layout Builder Restrictions
The second bit of setup to cover is enabling the layout builder for all the content types you wish to let the client modify. To do this we’ll head over to the manage display page of your content type and tick off the “Use Layout Builder” box under the “Layout Options” section and hit save.
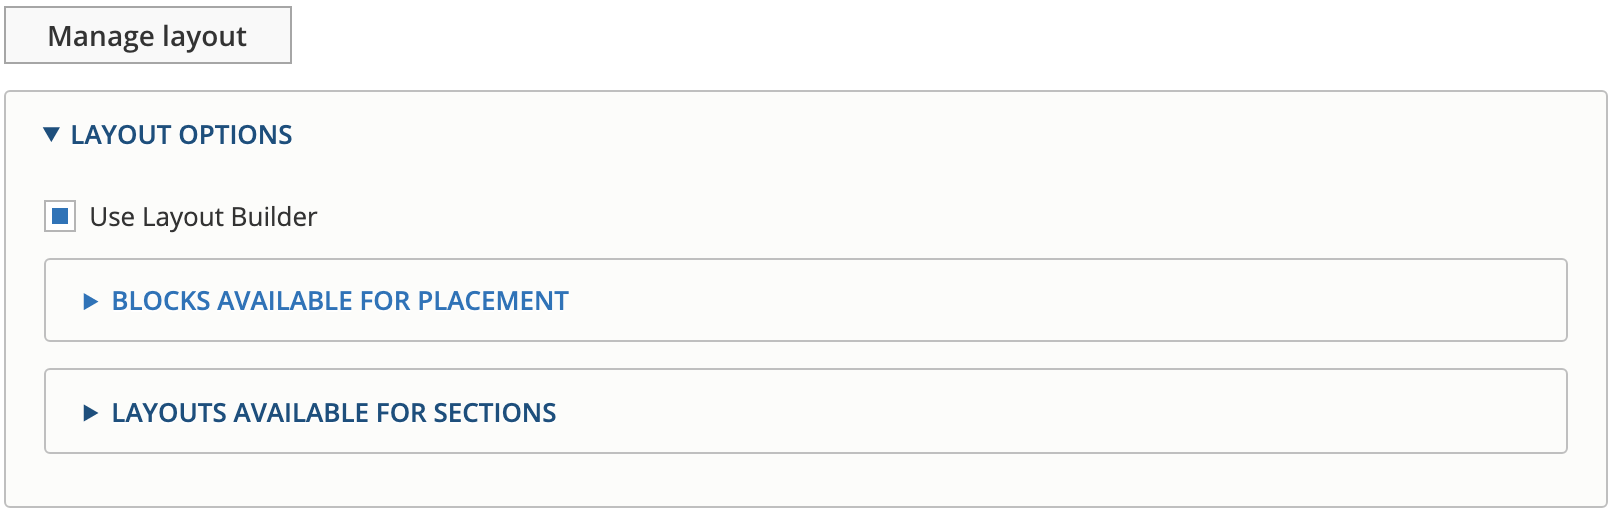
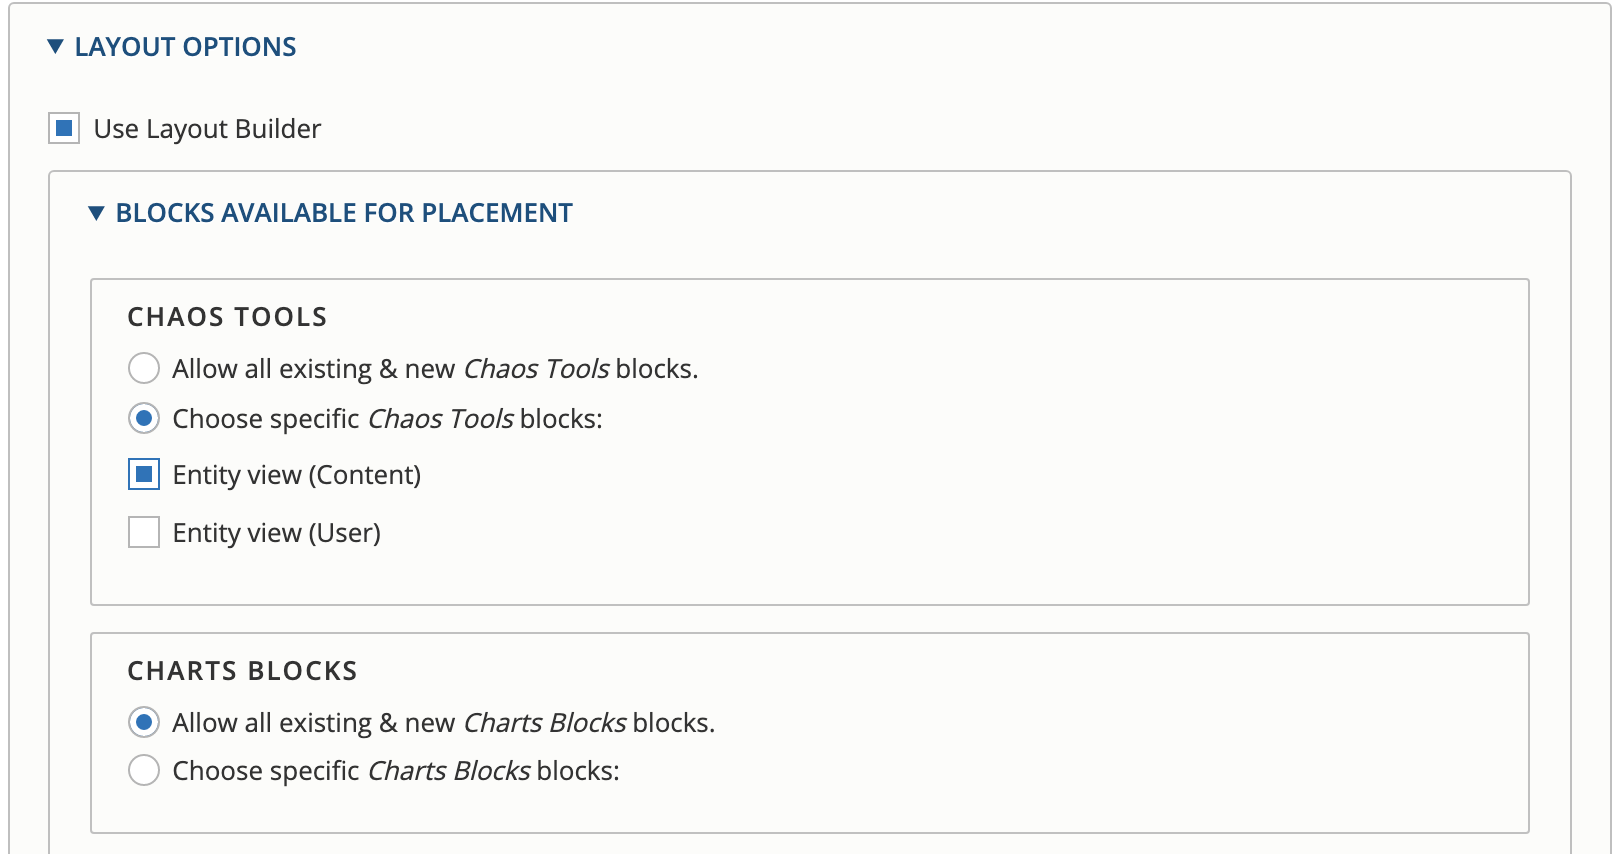
You should now see some extra sections under “Layout Options”, “Blocks available for placement” and “Layouts available for sections” These are added by Layout Builder Restrictions. Here we can set what blocks can be placed on a particular content type and define what layouts are available for them to use in sections. This allows us to maintain control over the look and feel of sections while still giving the client the freedom to customize pages as they see fit. We can choose to allow or deny access to all blocks supplied by a specific module or pick and choose what we allow/deny.
Once you have your blocks and layouts set you can click “Manage Layout” and set the default blocks and sections you want to be placed whenever a new node of this type is created. Setting a default layout will also allow the client to play around with layout ideas and always be able to revert back to the default at any time if they are unhappy with the results.
Creating your own layout templates
The templates that come with the module are a good start to get you going but once you really dig in you’ll probably want to start creating your own custom layouts. This is really easy to do. With the Layout Discovery module you can set them up in your theme or in a custom module. We decided to place them in the utility module we include in every site we build.
First, we’ll create the templates we’d like to use and place them in a folder called layouts within the templates folder of your theme or module. This is an example of a two column layout, with the exception of our layout classes it's pretty standard. You'll want to make sure you have the region_attributes printing out on your regions so the layout builder can include the classes it needs to function correctly. Without them, you will not get the correct styling within the edit mode, or the JS to drag and drop blocks between sections.
{#
/**
 * @file
 * A two-column layout.
 *
 * Available variables:
 * - content: The content for this layout.
 * - attributes: HTML attributes for the layout <div>.
 *
 * @ingroup themeable
 */
#}
{%
  set classes = [
    'layout',
    'layout--two-column',
  ]
%}
{% if content %}
  <div{{ attributes.addClass(classes) }}>

      <div class="l-grid--gutter l-grid l-grid-md--two l-grid-lg--two l-grid-xl--two">

        <div {{ region_attributes.first.addClass('layout__region', 'layout__region--first', 'l-grid__item') }}>
          {{ content.first }}
        </div>

        <div {{ region_attributes.second.addClass('layout__region', 'layout__region--second', 'l-grid__item') }}>
          {{ content.second }}
        </div>

      </div>

  </div>
{% endif %}
Once you’ve got all of the templates created you simply have to declare them in your layouts.yml file for Layout Discovery to pick them up. You can call this file my_module.layouts.yml or my_theme.layouts.yml. The snippet below illustrates the correct format for them to be picked up by Layout Discovery. Including the icon_map section will give you a nice visual representation of the layout, you can learn more about that here.
ignite_two_column:
  label: 'Two Column'
  path: templates/layouts
  template: two-column
  category: 'Ignite Layouts'
  icon_map:
    - [first, second]
  regions:
    first:
      label: First Column
    second:
      label: Second Column
In a future post I’d like to discuss some of the work we’ve done to allow custom styling to blocks and sections within the layout builder using config options and utility classes. Between controlling what blocks and layouts you’re providing clients, and creating some custom layouts, this should give you a pretty good starting point to provide a powerful tool for your clients. We’ve only scratched the surface of what can be done with the tool but we’re already pretty happy with the results.
Photo by José Alejandro Cuffia on Unsplash