Gutenberg Blocks Made Easy with ACF and Timber
The Gutenberg block editor has changed how we build content. Learn how to use Advanced Custom Fields and Timber to create custom blocks, fast.
The Gutenberg block editor has changed how we build content. Learn how to use Advanced Custom Fields and Timber to create custom blocks, fast.
The Gutenberg editor has revolutionized how content is created on the WordPress platform. Blocks make it easy to freely structure and style content as needed on a per-page basis.
By breaking page content down into discrete sections, or blocks Gutenberg empowers content creators to create unique pages with ease. They can now tailor each page to the specific needs of their content, providing a more seamless and consistent user experience. This also means that non-technical users can create visually appealing pages without the need for extensive coding or design skills.
To enable this, developers can harness the power of the editor by leveraging plugins like Advanced Custom Fields and Timber to craft custom, flexible, and reusable blocks for their WordPress projects.
Many WordPress developers are likely familiar with the Advanced Custom Fields (ACF) plugin. ACF is a powerful tool that enables developers to add a wide variety of editable fields to many areas of the WordPress admin interface, including post types, options pages, and individual Gutenberg blocks. In this article, we’ll focus on the latter, as it provides much of the custom block editing interface to the end user or content creator.
While the block fields provided by ACF are the bare minimum to create these types of custom blocks, the Timber plugin gives developers access to the Twig templating language. This lets developers write Twig markup, rather than a mixture of PHP and HTML, which can often lead to disorganized or inflexible code.
Before we can register a new block, we must first create its definition. WordPress expects this definition in the form of a block.json file, where we define the block’s name, description, feature support, and more. Explanations of each of these properties can be found here: https://developer.wordpress.org/block-editor/reference-guides/block-api/block-metadata/.
At the bare minimum, the WordPress block definitions require a name and title. It is aslo recommended to add the associated schema, to help editors like VSCode provide autocompletion and validation.
{
	"$schema": "https://schemas.wp.org/trunk/block.json",
	"name": "mytheme/myblock",
	"title": "My Block"
}
In order to work with ACF, we also define a custom acf property with some additional information.
{
-	"$schema": "https://schemas.wp.org/trunk/block.json",
+	"$schema": "https://advancedcustomfields.com/schemas/json/main/block.json",
	"name": "mytheme/myblock",
~	"title": "My Block",
+	"acf": {
+		"mode": "preview",
+		"renderTemplate": "my-block/render.php"
+	}
}
We’ve updated the schema used, as ACF has recently provided one that includes support for their custom properties. Read more here.
Under the new acf property, mode is the default state of the block after a new instance is added to the editor. renderTemplate is the PHP file that will be used to output the block markup.
Be sure to create the render.php file with the following contents:
<?php // my-block/render.php
echo '<div>Hello from My Block!</div>';
As an alternative to renderTemplate, there is the renderCallback function which can bet set to a string name of a function that will handle rendering instead.
At this point, our block is fully ready to be used in the editor. All that is left is to register it for use. To register a block using the block.json definition, simply call register_block_type and provide the path to the definition file.
In functions.php, add the following:
register_block_type( get_stylesheet_directory() . '/my-block/block.json' );You can now try editng a page and adding the newly created block!
Let’s improve the block by rendering a twig template instead of a plain PHP echo.
First, create a twig template at my-block/template.twig with the following content:
{# my-block/template.twig #}
<div class="myBlock" id="{{ block_id }}">
  <h1>{{ title }}</div>
</div>
Next, we update the render file to use this template, passing some simple data to it.
<?php // my-block/render.php
Timber::render(get_stylesheet_directory() . '/my-block/template.twig', [
  'is_preview' => $is_preview,
  'block_id' => "my-block--$block['id']";
  'title' => 'Hello from My Block! (Now with Twig templating!)',
]);
We no longer simply echo out the block content, but instead use Timber to render the Twig template created previously. Timber::render() is passed a path to a template, as well as the data context, and will print the resulting markup. Should you need to render a template without it being printed, Timber::compile can be used instead, with the same parameters.
Several variables are available in the render.php file.$block contains information about the current block instance, including the block id, which we use to generate a unique and readable id before passing to the template. It will also contain information about block settings, specifically those created by supporting editor features like alignment, colours, etc.
The $is_preview variable is also available, which is a Boolean that informs us if the block is currently being rendered in the Gutenberg editor or admin interface. This can be used to adjust how we render our block to disable specific behaviours, adjust styles, and so on.$post_id is also very useful, as it can be used to get data about the post on which the block is currently being used.
More information on available variables: https://www.advancedcustomfields.com/resources/acf-blocks-key-concepts/#block-variables-or-parameters-for-callbacks-in-php
Now that we have the a basic block available to place on our pages, we can provide the content editor with some editable fields to provide even more customization options.
Please note: Custom block fields is an ACF Pro feature!
In the admin dashboard, open the ACF page and click “Add new” field group. We’ll simply create a Text field named “Title” for now.
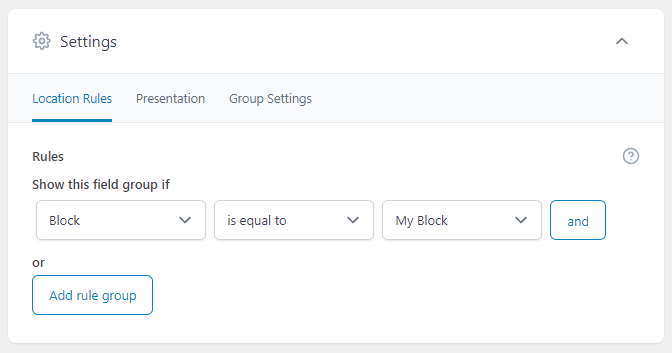
Before saving, we need to set the Location Rules to use these fields on our new block. Set “Show this field group if” to “Block”, “is equal to”, “My Block”. Then save the field group.
Go and edit the page where we placed our custom block, and notice that we have our new field available! Add some title text and save the post.
Before that value will be displayed in our block, we need to also fetch the title in the render template and pass it along to the Twig template. We can fetch ACF field values easily with get_field()
// my-block/render.php
Timber::render(get_stylesheet_directory() . '/my-block/template.twig', [
	'is_preview' => $is_preview,
	'block_id' => "my-block--$block['id']";
-	'title' => 'Hello from My Block! (Now with Twig templating!)',
+	'title' => get_field('title'),
]);
Since the twig template is already rendering the title with {{ title }}, we can reload the post and see our block showing the title entered by the content editor. Great!
You now have the basics of creating a flexible, easy to develop custom block for almost anything you can think of.
As an extra step, we can allow our custom blocks to accept other blocks as content using the InnerBlocks tag. To enable this, simply add<InnerBlocks /> to the twig template:
{# my-block/template.twig #}
<div class="myBlock" id="{{ block_id }}">
	<h1>{{ title }}</div>
+	<InnerBlocks />
</div>
When editing the block, we can now add any other blocks as content. However, it should be noted that each block can only have one Inner Block tag.
The type of blocks allowed in the Inner Blocks area can also be limited to a specific list using the allowedBlocks attribute, like so:
// render.php
Timber::render(get_stylesheet_directory() . '/my-block/template.twig', [
+	'allowed_blocks' => esc_attr(wp_json_encode([ 'core/heading', 'core/paragraph' ]));
	'is_preview' => $is_preview,
{# my-block/template.twig #}
<div class="myBlock" id="{{ block_id }}">
<h1>{{ title }}</div>
- <InnerBlocks />
+ <InnerBlocks allowedBlocks="{{ allowed_blocks }}" />
</div>Now only heading and paragraphs can be added as content to our block.
Custom editor blocks stand out as an exceptional tool empowering developers to efficiently craft distinctive and reusable content elements tailored for editors. The integration of Advanced Custom Fields and Twig templating via Timber not only streamlines the development process but also ensures a seamless experience for both developers and content creators.
So, go ahead and explore the possibilities – have fun bringing your unique visions to life!
Further reading and resources: